Adapted from an earlier work
GNU+Linux, is a libre OS with a focus on user freedom and an Unix-like computing experience. If someone told you to try (GNU+)Linux, Install Gentoo, or something similar, this page is for you and will teach you how to (at the minimum) install a GNU+Linux distribution called Linux Mint. Of course, there are plenty of other distro(butions) for niche features, different people, or Stallman-like needs. If you are willing to go off the beaten path (most of what is here will be the same for other distros, but make sure to follow official install guides), you can see Distrochooser or the linked picture to give you an idea on how to make a selection.
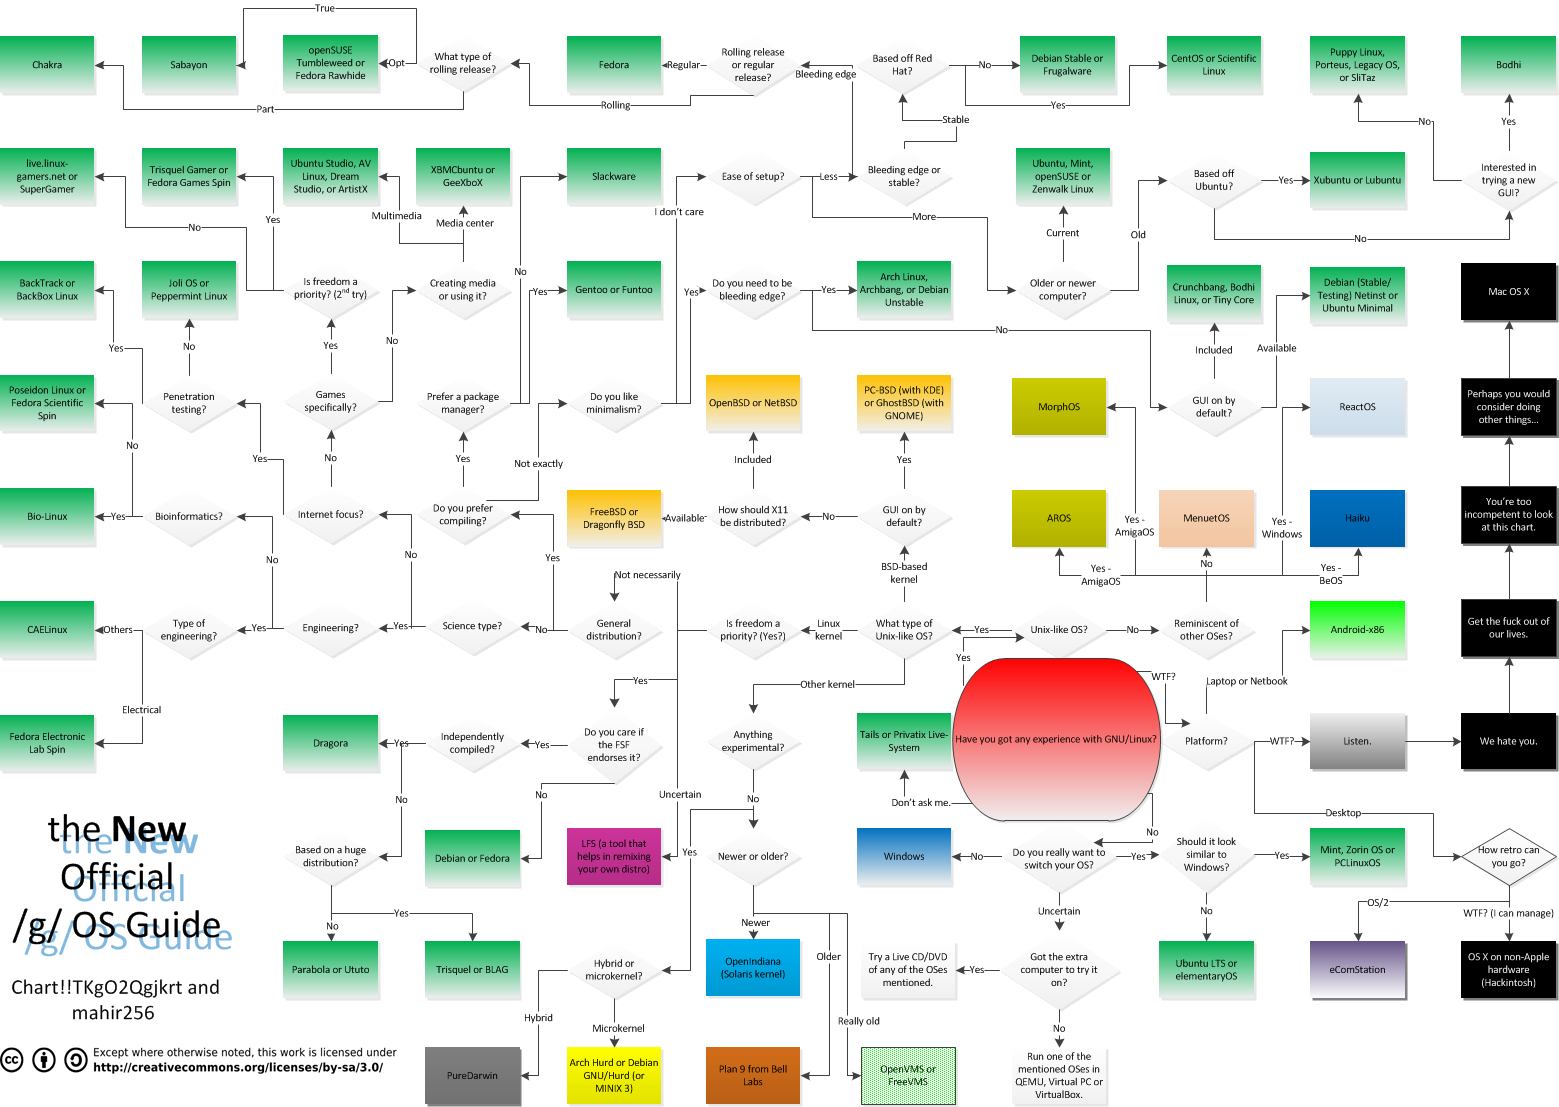
[DISCLAIMER: Everything that you do is your fault, any loss of data is
your fault and I, the author, accept no responsibility for anything that
happens when using this guide. REMEMBER TO BACK YOUR DATA UP!]{.small}
There are several steps you should do before swapping your OS entirely, one of those being to try the OS out on a Virtual Machine (VM). A VM is a piece of software that allows you to emulate a computer within a computer. You can run any operating system you want so long as you have an image file (in our case a .ISO) of that OS. The Linux Mint ISO can be found here. There are multiple versions of Linux Mint (Cinnamon, MATE, and Xfce), each of these will effect the look of Linux Mint after install, you can look up each of these and find images of how it will look or even download a copy of each one to try out. I suggest the use of Cinnamon for brevity's sake, but do as you wish in your own time. If you wish to swap to another desktop environment later, you can quite easily without installing the OS over, but for tutorials sake, that will not be covered.
Now that you have the .ISO file, you need a virtual machine to run it in. I suggest Virtual Box. Download it and open it. Once Virtual Box is open, follow the steps below.
-
Click the New icon in the toolbar to start the wizard (blue spiky ball icon).
-
In the popup you name your new virtual machine. VirtualBox will try to guess what operating system you’re going to use by analyzing it’s name. For this walk through, we’ll use GNU+Linux Mint.
-
Enter “Linux mint” as the name. VirtualBox will guess the Type as “GNU+Linux” and Version as “GNU+Linux 2.6 / 3.x (64 bit)”. Have a click about to see the other options. 32bit and 64bit guest machines are possible (on a 64bit host) and plenty of GNU+Linux distros are named specifically, along with Windows, Mac OSX and BSD.
-
With "Linux" and "Linux 2.6 / 3.x (64 bit)" selected, hit Next.
-
On the memory size screen you can specify how much of your Host machine’s RAM is to be allocated to this Guest machine. VirtualBox will default to a minimal amount of ram (256Mb for GNU+Linux) and you will want to allocate more (1024mb is good). Allocating less is generally a bad idea unless you have a reason to.
-
Hit next.
-
On the first Hard drive screen you can specify what kind of hard drive to give your Guest machine. The options are: Create a virtual hard drive now (default): Probably what you want. Use an existing virtual hard drive file: Let’s you import another Guest hard drive to this Guest machine. Do not add a virtual hard drive: For use only if you have a good reason.
-
With “Create a virtual hard drive now” selected, hit Create.
-
Next are the options for the type of our Guest hard drive. VDI (the default) is fine. This screen is not for selecting the intended file system (NTFS, ext4, etc) but for the format of the Guest hard drive.
-
With VDI selected, hit Next.
-
Now a choice to Dynamically allocate (default) the Guest hard drive as required, or use a Fixed Size. Dynamically allocated still has a maximum size, but it is created as required (e.g. if the Guest machine is only using 2gb of an 8gb hdd space, it’s file on the Host will be 2gb). Fixed size creates the entire drive in full right now (e.g. if the Guest machine is only using 2gb of an 8gb hdd space, it’s file on the Host will be 8gb).
-
With “Dynamically allocated” selected, hit Next.
-
Finally, options for the maximum size and name of the Guest hdd. GNU+Linux Mint and Windows 7 need at least 10gb for an install. Set it to 15gb or more and hit Create.
-
With your virtual machine selected, hit the Settings icon on the toolbar.
-
Select the Storage category.
-
Select the “Empty” IDE Controller with the picture of a CD.
-
On the right, under Attributes, click the other CD icon for CD/DVD Drive.
-
In the drop-down menu, select Choose a Virtual CD/DVD disk file.
-
Locate and select your .iso
-
Hit OK to you virtual machine’s Settings screen.
With this all done, you can now finally boot by clicking the green arrow that is labeled start. You are free to explore around this OS as much as you like and get acquainted to it. You are free to change any settings you want or screw around as much as you want. This is a VM and any damage done can easily be reverted (though this does not mean install a million viruses, there are VM busting viruses that can get onto your main PC so use common sense). It is advised you actually do the install process (something that many people can figure out on their own, especially on a VM.) or else your files in the VM wont save. You will likely encounter something that says it will “wipe your disk and install GNU+Linux and that you could lose files”. This will not affect your main drive if you are on a VM, however, if you are doing something like Dual-Booting, you should be cautious and NOT do this. Dual-booting will have its own section on this.
Common Concerns and Fears about Virtual Machines:
Will the OS be as slow as it is on this Virtual Machine?
No. Not only did you probably set VirtualBox to only use so much of your ram, your system is running GNU+Linux, Windows, and whatever applications you already have running all at the same time. In reality the OS will likely run just as fast, if not faster, than what you have currently installed.
I’m scared my computer won’t boot
VirtualBox runs inside Windows (or Mac OSX). Even when you do a real install, there are good tools that can fix your boot setup and recover your files in the unlikely event that happens. Make sure to do testing before installing a whole new OS.
I’m scared I’ll break my Windows partition
VirtualBox doesn’t have the power to mess up your Windows partition any more than Firefox or Chrome does. On a real setup, Linux Mint does the partitioning for you if you desire.
I’m scared I won’t be able to get rid of GNU+Linux
The Virtual Machine image can literally be dropped into your Recycle Bin and deleted like any other file and VirtualBox can be uninstalled like any other application. Getting rid of GNU+Linux if you are dual booting is just a bit more complicated. If you installed it over Windows, you can remove it with this tutorial.
I’m scared I’ll get stuck offline and won’t be able to access help
You can switch between VirtualBox and your other applications (such as your web browser) at any time by holding right control, if you're in full screen mode Right Control + F will get you out. For normal GNU+Linux installations, this is usually only a problem with wireless internet, but you’ll most likely be fine, especially if you dual boot Windows/Mac and GNU+Linux.
I’m scared of pressing the wrong option during the GNU+Linux install
You can Snapshot your Virtual Machine and revert to a previous version at any time (just like save stating your snes roms). On a normal install for Mint, the only real thing you have to look out for is if Mint doesn’t recognize your windows partition, or if you get a specific error (unlikely). If you do click something by mistake, you can click the back button as it doesn't actually write any changes until you confirm at the end.
I’m not sure my hardware is supported in GNU+Linux or needs special drivers
VirtualBox’s virtual hardware will all work with Mint. On a proper install though, unless you're using something highly obscure or a oddly specific NVidia card, you should be fine. Though, if you run into an incompatibility, you can use the Driver Manager in the bottom left to swap from open source to proprietary drivers. [1]
Booting from flashdrive.
[[REQUIRED FOR A PROPER INSTALL].]{.small}
This section will be on booting GNU+Linux onto a flashdrive. Do you have a spare one lying around and are willing to wipe it? If so, then you can do this.
- There is a program for flashing USBs called Rufus. It is required if you are using Windows and can be found here. Since this is only for Windows though, if you use Mac or any other OS you should look up an external tutorial on how to create a bootable drive.
- Plug in the drive you wish to wipe. This will destroy everything on the drive, so make sure nothing you care about is on it.
- Open Rufus and at the top select your USB device (if it didn’t do it automatically).
- Click Boot selection and click Disk or ISO image as your boot selection.
- Click select, this will open a menu for you to find your ISO image. Open that and most options will be automatically selected.
- It is advised to change your partition scheme to MBR as it has the most compatibility.
- Change the Volume Label to GNU+Linux Mint.
- Make sure the cluster size is 4096 and and the file system is FAT32.
- Click start and wait until the drive is done formatting.
Dual-Booting
Dual Booting is the term used for having two operating systems installed on the same machine. When you turn on the computer a menu called a Bootloader will display, asking you which operating system you wish to boot into. This will typically timeout and select the default operating system after a number of seconds. This process, if failed, can lead to data loss/corruption. It is advised that you are cautious when doing this and follow the steps as well as you can. The disclaimer at the start was mostly for this section, as you will be messing with how your hard drive is partitioned. This tutorial is for Windows only, Mac users will have to go somewhere else for this. You should try some of this out on a VM for practice if possible.
- Press The super key (Windows key) and R
- type in diskmgmt.msc and hit enter
- Right click your main drive (should be C:) and click ‘Shrink Volume’
- It should ask you how much you want to shrink the drive in MB (Megabytes). This will be how big your GNU+Linux Partition will be in total. Do note that at least 10 GB should go to the root (administrator) drive, so prepare for that.
- You should now have a section of your hard drive that is unallocated. This is what we wanted to do. This space has been taken from your original hard drive and has been set as “unused”. This data set cannot be read or wrote to unless this is changed. This will be used to load the OS onto.
- Turn off your PC, plug in your Boot-drive, and boot from your USB.
- You should now be in Mint. Double click install.
- you should be asked about your language, choose your language.
- then choose your keyboard layout.
- OPTIONAL: Install multimedia codecs. For the real plug-and-play experience, check this as the cost of some freedoms as sine if these are proprietary.
- THIS STEP IS IMPORTANT, DO NOT CLICK ERASE DISK DATA. THIS WILL (actually) ERASE YOUR DISK DATA. Click Something Else then continue.
- You should see a section called “free space”, click this and click the plus in the bottom left.
- You will make be making at first a Root and Home drive. To make a Root drive, type / into the mount point and change the size of the drive to what you see fit and click OK. Root is where all your program files will be located (akin to the System32 or the Windows Folder)
- OPTIONAL: You can make a swap area, but this feature is not used on Linux Mint as it opts for Swap Files. Other distributions may need this though, so if you want to create one: Click free space, click plus again, click the box next to “Use as”, and then select “Swap Area”. Change the size to whatever you wish, a good size would be the amount of RAM you have +1 GB.
- Finally, click the free space and the plus again. Type /home into the mount point and then click ok, you should have no more free space by now.
- Once you are done, Double check what you did and make sure this is what you want. This will overwrite the areas you defined with new data. Once you made sure you are sure you have what you want, click "Install Now".
- Next, you will be asked to set your location for time zones
- Finally, set up your user account along with encryption. I would recommend encrypting your home drive, but do note that not having your password will make your drive UNRECOVERABLE.
- After you are done setting up your user account, the system will install itself. This may take a while depending on your hard drive and internet speed, so do get comfortable.
- Once the process is completed, you will be prompted to restart. Do so and, when booting, you will be prompted with a screen to choose your OS. Simply select Linux Mint, or let the timer run out, and you will boot into Mint.
- Once you're in, you're done and have successfully installed a new OS. Pat yourself on the back because you have just done something around 98% of people don’t know how to do.
- From here, start exploring around and installing stuff. Look up what you want to install on your preferred browser with the term "Ubuntu" or "Mint" at the end. Mint and Ubuntu are brother OSes, with Mint being based on Ubuntu, so most things that work on Ubuntu should work on Mint. I would also advise changing the default page for Firefox from Yahoo to something else (DuckDuckGo isn't bad), looking into how you can change the appearance of your machine to suit your needs and some introductory information on the terminal and how to use it to speed tasks up.
Footnote
This issue of incompatibility is less common on OSes that are more up to date, use backports, or that allow you to manually install drivers (such as the nouveau drivers).